The Lacquer Ring – Beach/Tropical

Are you Sea-Rious? That’s the polish I chose to use for this look by Glam Polish from their Under the Sea collection. This is what started my brainstorming for this look and my decision to go more Beach rather than Tropical for our TLR theme.

IMG_5158

I still have yet to get my macro pics quite down as good as most bloggers :/ Perhaps below if you have any recommendations for me, I’d be happy to hear. I am currently using my Iphone 6 along with my macro clip on piece I got on Amazon. Sometimes I use the lighbox I have sometimes I don’t but I don’t have a problem with lighting so much as I do the clearness of Macros..

Anyway, Are you Sea-Rious? is a gorgeousssss seafoam green holo with shimmer and holographic aqua micro-glitter. It’s a textured polish which also reminds me of the beach but I did use a top coat in this case.  I stamped a large seashell on one of my nails using my MoYou plate. I used the same MoYou plate that has the same seashell but a bunch of little ones on the other fingers. I used Essie’s Good as Gold as my stamping color.

IMG_5159

IMG_5165

IMG_5175

IMG_5163

I’m even wearing my mermaid ring to match my beach theme today 🙂

IMG_5199

Please let me know what your macro tips are 😉 Please check out all of our lovely TLR ladies we have some new members 🙂

The Lacquer Ring – Seafoam

Whoa, two back to back posts on the blog!? That’s right! This time I have our latest TLR post for you Seafoam.  This color is perfect for me not only because I have  A LOT of Seafoam green and blues, but because our car color was Seafoam Green! Before our Camry we,  had a Seafoam Green Altima. Don hated it! I got it just before we started dating so he basically had no say in the color! lol  I bought it used so I really didn’t either, but I loved it, of course! He always said it looked like toothpaste! 😦  In any event, I had plenty of options for this theme.

I ended up choosing Cirque’s Julep and I did an accent nail using Lime Crime’s Milky Ways and some polka dots with Julep.


IMG_5050

IMG_5049


IMG_5051

So our Altima wasn’t quite this sparkly, I wish it was, but it was a gorgeous color

Make sure you check out the other TLR girls, be sure to welcome them as we all have!!

Have a good weekend all!

The Lacquer Ring – Floral

Hey, look at that… the blog works! LOL I have been posting mainly on Instagram lately @Maes-Beauty but wanted to take the time to post today to introduce all of our new TLR members! In case you haven’t seen already, we recruited a few new members, some of which posted in our last prompt, silver. In no particular order, Please welcome our newest TLR ladies

Ashlee of Painted Nubbs

Jessica of Sloppy Swatches

Ana of Ana’s Manis

Jessica of Delight In Nails

Roselynn of Manicured & Marvelous

Cheyenne of cdbnails

Oksana of The Polished KOI

Genevieve of Suger23

We are so happy to have them!

On to this week’s prompt, floral. I wanted to use this flower stamp I had and it made me think of Hawaii so I chose a sort of Hawaiin theme here, or at least I hope that’s how it’s portrayed.. lol

For this look I did a gradient using Jessica’s Banana Peel and Tangerine Dreamz. I stamped

the flower using Illamasqua Boosh.

IMG_4993IMG_4982


IMG_4981

The third picture looks a little blurry, I was messing around with my fisheye  camera add on to my phone.

So there you have it, new members, I finally posted ON my blog, and I have some Hawaiin flowers for you today!

Until next time… make sure you follow me on Instagram @Maes-Beauty and be sure to check out the other TLR girls

Have a Safe and Happy Holiday weekend, and please remember what Memorial Day really stands for!pro-memorial-day-final_12

The Lacquer Ring – Dotticure

We are back with some dotticures! Although Frosso pointed out she picked this month even though I thought I did.. lol dotticures are one of my favorites to do, the color options and patterns are limitless. Oh did I also mention I am obsessed with Polka Dots, hence why I thought I picked this 😉

On Monday I have an interview!! So I wanted to mess around with some neutrals as I normally don’t do too many manis like that. Although I will probably put on something even more neutral, I absolutely love the way this came out!

I used OPI’s Gwen Collection for the most part, 4 In the Morning, Push and Shove, and Love.Angel.Music.Baby along with Essie Good as Gold and the base is China Glaze Dandy Lyin’ Around

IMG_7712

IMG_7714

IMG_7716


I cannot say enough how much I love how this turned out… normally the ones I love you guys don’t and visa versa, lol so tell me what you think, and what’s your favorite dotticure color combo if you have one 😉

Don’t forget to check out the other TLR girls!

The Lacquer Ring – Red

I am not sure who picked this month, however with the color and the next theme in two weeks I am thinking it was me, you’ll see why. Either way this month (as always) we have great colors and themes in store. Check out how #TLR does red!

My husband was so sweet and bought me the Ciate advent calendar for Christmas this year. I had so much fun opening it up each day, he gave it to me early so that I had a present each day of the month! For this look I am using one of the Ciate’s I got called hutch, I love how hookery this red is. lol I also used Pretty Serious’s Viscous Vampire.

Don and I have been watching Supernatural on Netflix lately… with the name of the Pretty Serious color I chose, I call this mani ‘My Bloody Valentine’ after the name of the episode we just watched 😉

IMG_7684

I painted two thin coats of Hutch and then painted Viscous Vampire as a gradient on the tips

IMG_7685

This second pic is more accurate of how it looks in person, sometimes the lighting is just so hard to get with some of these polishes! I do like however in the first pic how you get the different shades of the glitters. Pretty Serious website description states there are both red and fuscia in there 😉

Well there you have my red mani just in time for Valentine’s Day! Check out the rest of the TLR girls for their manis!

The Lacquer Ring – Mandala Inspired

So as it happens I have no stamps mandala-ish nor did I really know what mandala inspired really was. I asked our expert and of course the one that picked this prompt, the #goldmasta V. I sent her a few pictures of some stamps that I could possibly pass as mandala and she approved of this one. Of course you did.. the one that was something I’ve never done before that was for sure to take me forever…. lol

IMG_4383

I decided to use my Uber Mat that I got for Christmas. When I got it I feel like all of my creative-ness went away lol I know that the opposite is supposed to happen… I’ve been watching a lot of how to’s with the uber mat capability and in making your own decals so I decided to give it a shot.  I sent the one that I tried to Sib and she loved it so decals it is..


First step was to choose my colors, online mandala inspired were both plain and just the design or multi colors or different shades of the same color. I went for a white base with the black outline and blues for that pop over the white.


Step 1: Using my Ubermat I painted a layer of clear in 10 positions on my mat

Step 2: Once dry enough, using my stamper, I stamped the desired design on all of the clear spaces I had painted

Step 3: Now here comes the tedious part, Using a brush or a dotting tool, I painted in the desired spaces (tip: Do all of your smaller spots first or lighter colors and then you can fill in overtop of it with another color for the spaces around it, as you will be flipping the decal over anyway)

For this step I did one color at a time and just put a drip of each color one at a time and started to color in my spots

Step 4: Once all desired spaces were colored in, I went an extra step as I hate white base polishes.. I don’t know about you but I feel like I can never get a white to look perfect on my nails. As you will see from my picture I also did 10 white spaces as well. This next step was to gently peel up my decals one by one and while slightly still wet from the colors to place them overtop the white to make the white on my nail more opaque and make my life easier

Step 5/6: Once my base coat was applied, one by one I painted a white layer on my nails. While the white from each nail was slightly wet not quite dry and not freshly painted, I peeled up the design I made with the white as shown above and applied it to my nail

Step 7: Using a clean up brush and tiny scissors or a cuticle cutter cut the overhanging detail and press down to secure. Once fully secure continue cutting off excess and getting excess off with polish remover and your clean up brush around your cuticles

Step 8: Top coat and done

I am no expert, as I said this was my first time ever doing these and they for sure need some improvement. If you have any tips or tricks to help me out in the future please, please let me know!

Tools used for this mani: (for prep) Sally Hansen cuticle gel, cuticle pusher, cuticle clippers, file (for mani) cuticle clippers, tiny scissors, MoYou Bridal Plate 06, nail polish remover, fine dottig tool, and two clean up brushes one angled & one straight.

Here is a close up of the design bridal_nail_art_design_06_

Polishes used for this mani: OPI Nail envy base coat, China Glaze white out, Cirque Monte Carlo, Cirque Cabana Capri, Illamasqua Boosh, Lemming Lacquer Curiouser & Curiouser!, OPI My Pal Joey, jessica Barely Blueberry, and Cirque Twilight

Now for the mani pics 🙂

collage

For my right hand I did the decals and for my accent hand a gradient using Cirque’s Monte Carlo and Twilight

For my left hand I did the decals on each finger and for my accent just used Cirque Twilight

IMG_7675

This picture I know is very bright, I was messing with my camera options and just really liked how vibrant the colors looked in my decals

IMG_7662

For once I liked how my right hand came out better than my left, I am sure it has something to do with the fact that my left/model hand my pointer finger nail broke this week 😦


So there you have it, my Mandala inspired and first time making decal nails! What tips do you have for me or others that want to try the decal look again? What do you think of all of the girls mandala inspiration nails?  Check em out below!

TLR Snowflake nails

I know, I know, I’m late posting again.. ugh lol I thought I would have more time but I didn’t. With the Holidays coming, as most of you know this is the busiest time of the year. I missed out on Red glitter and yesterday was snowflake. Surprise! I mixed them together! lol

This is China Glaze’s Ruby Slippers. I also stamped snowflakes using both China Glaze white and Essie’s No Place Like Chrome.

IMG_7654IMG_7657IMG_7656

Be sure to check out the other TLR’s and Happy Holidays everyone!


TLR – Man nails

This month, we did back-to-back TLR’s with the holiday next week. Last week as you already know was ‘Cream’ color.  This prompt is ‘man nails’, done by or inspired by.

I tried very hard to get Don to do my nails… yea that didn’t work.. lol.  I had him instead come up with nail colors and inspiration.

Don’s original choice was he wanted ‘hooker red’ so he chose Nubar’s Lustful Red. Okay color down, then he looked through all of my stamps and came up with the splatters from my MoYou stamp. He wanted me to use black so I did Illamasqua’s Boosh. He said the colors and the stamp reminded him of when the Venom Symbiote took over Spider-man


Here are the inspired by my man nails..

1106507

This is the inspiration for the nails, This is Venom vs Spider-man. 

IMG_7648

Venom vs Spider-man nails

Superior-Spider-Man-22

This is Venom taking over

IMG_7652

Venom taking over Spider-man nails

IMG_7650

Venom vs. Spider-man nails

Superior_Venom

Venom

There you have it, what do you think?

Check out the other girls man nails

The Lacquer Ring – Cream

193

Whoa, three posts to the blog now…  I told you I was going to try to post more often!   Today’s prompt for #TLR is Cream. I only have a handful of neutral colors so this was hard for me.  I asked the girls if I could get away with Cream finish’s and they said no! whomp whomp! lol  In any event with the help from the group they helped me choose Nubar’s Spirit Walker.  It’s funny because when I first started blogging and I was following Cynthia, She posted this color and I fell in love with it!

I present to you Nubar’s Spirit Walker with some gradient tips using Sally Hansen’s Forbidden Fudge! I didn’t like my nails just plain neutral so I had to add a little something without taking from how gorgeous this neutral is on its own.  Spirit Walker has a tint of like a pink shimmer so I thought it would pair nicely with the shimmer from Forbidden Fudge.  Although I didn’t want to do the neutral on it’s own I can’t say that I love the way the mani ended up either :/  It doesn’t help that I am still sour that I had a break and they are nubs again 😦

IMG_7638With that being said, since I didn’t love it, you only get one picture lol.  Isn’t Spirit Walker such a gorgeous neutral though! Can you see the hints of pink shimmer?

Don’t forget to check out the other TLR girls, let’s see what they came up with!  Also with the upcoming Holiday, be sure to check back NEXT week (not two weeks from now like normal) for the other November TLR Prompt


Finally, be sure you are following me on Instagram, or on Facebook for other updates or looks you might have missed in my absence of the blog.

I will also be adding lots more polishes to my blog sale up on Storenvy! Check that out!

you-nique Moonstruck 3D Fiber Lash Review

logo_print

*These Strips were sent to me for my unbiased review*

Although this is my sister that sent this to me to review she sent it to me knowing I would give my honest review either way, even if she is family. I spend a lot of time researching the best make up so that I don’t buy crap and waste my money. As always I can assure you that this is my unbiased and 100% honest review. 

I had ordered the Moonstruck 3D Fiber Lashes I guess about a year ago now through a friend that was having an online party.  I am a sucker for mascara and I will try anything that says it gives you longer or fuller lashes. Mine are naturally longer just very blond, I love to make my lashes appear fuller and longer without looking fake so I figured let me try this.

The old formula was very messy to say the least. I also was kind of skeptical when the old instructions stated for me to spend almost $30 to then still have to use my own mascara as the base… uh what? IMG_7566

The old instructions were as follows:

  1. Use your mascara
  2. Once dry, apply the Transplanting gel
  3. While still wet apply the fiber lashes
  4. Seal in by applying the transplanting gel again

Not too many steps but still a pain in neck. I’m not gonna lie, I am getting a little older so my beauty routine consists of more than it used to.. I now need concealer for under my eyes for the bags and dark circles, more and more red spots or acne spots, pore concealer for the lines and more visible pores. Using my already $20 mascara then a gel then the fiber lashes then the gel once dry was just too much. I never ended up using it every day. It got used a couple of times and then stayed in my drawer.  It also didn’t help that the case was enormous and hard to keep in my make up bag

All in all my review of the old process, packaging, and formula is as follows:

Pros:

-Does make lashes appear longer and fuller

Cons:

-Time consuming, too many steps

-Messy – I would have fibers fall out on my cheeks while I was applying and later once I blinked throughout the day with them falling off

-Large packaging – not easy to transport with other make up

-Price, too pricey for me to justify if I also have to use my own mascara.


Now, for the NEW formula and NEW packaging!

IMG_7567IMG_7568

This packaging as you can tell is much smaller, the bottles are slightly longer however now they come in this nice pouch instead of an almost eye glass case, making it much easier to transport. Let’s see how the new formula matches up..

My first impression already is that I am much more excited to try these, I love the bottles, I love the smaller bag to travel. I especially love that there is a window to see the product and how much is left! Why didn’t other companies think of this!!

The instructions for the new formula are slightly less annoying and less steps

  1. Apply the transplanting gel
  2. Apply the fiber lashes
  3. Seal again by applying the transplanting gel

Although this is only one less step, it already makes me feel more at ease, if it works because I don’t have to use my own mascara. This product could essentially replace my mascara. Let’s see how it does put to the test.

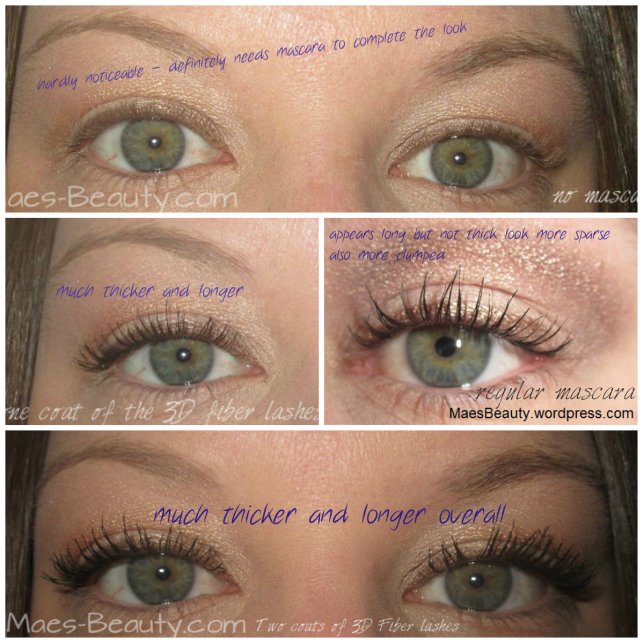
This is me without mascara

IMG_7595

Again, without mascara IMG_7592

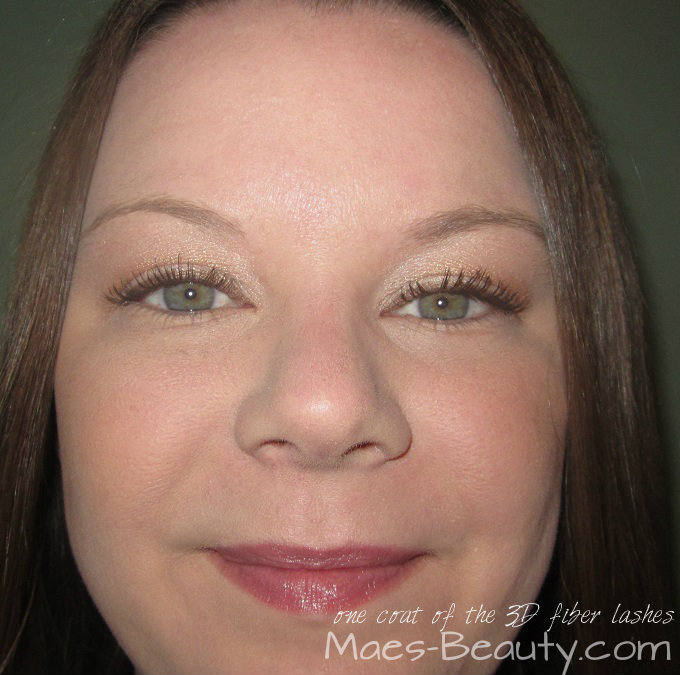
I then applied one coat of the 3D fiber lashes. Transplanting gel, lashes, then gel again. One eye at a time

IMG_7600

Close upIMG_7596

You can already see the fullness that it gives

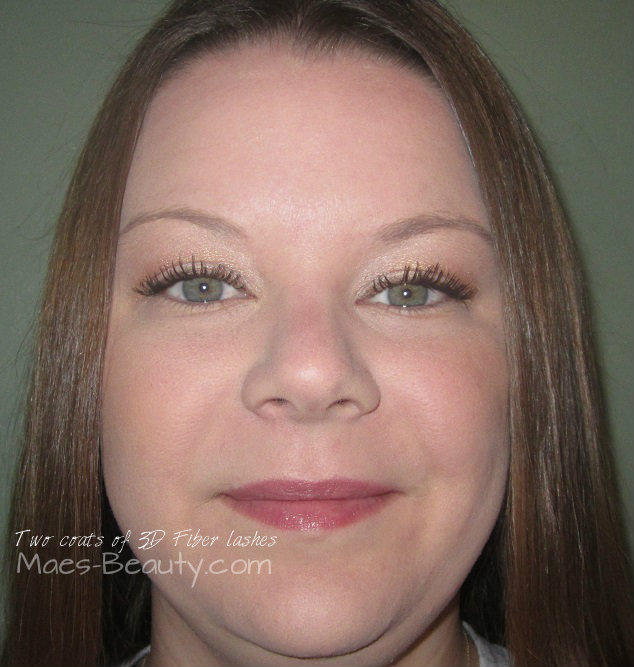
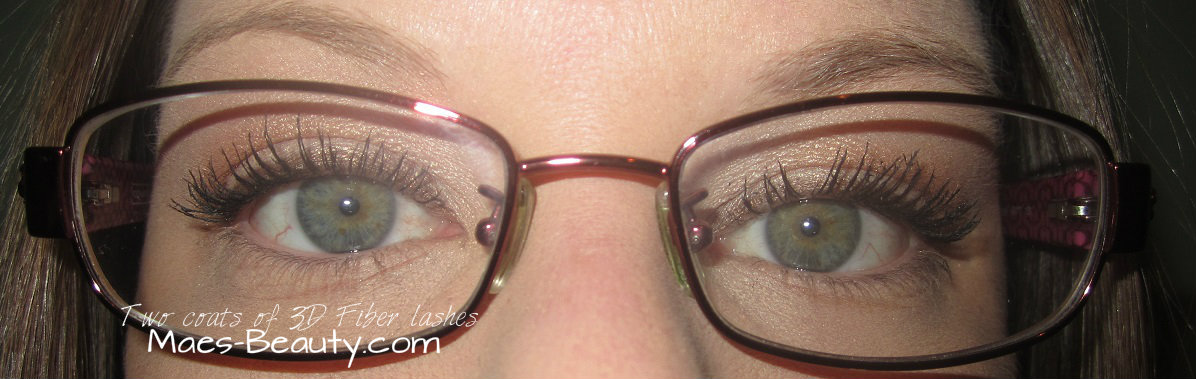
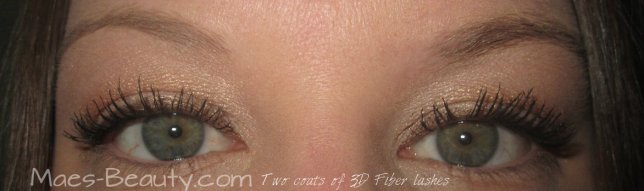
Here is two coats- Transplanting gel – lashes – transplanting gel – let dry – process once more

IMG_7603

You can see the slight increase in length and fullness

Here’s the close up

IMG_7602

I think that the two coat is more for an evening look or a special event, not time worthy to attempt every day… unless of course you have that kind of time then by all means.. lol

Finally, for a glasses wearer there is nothing worse than doing your make up only for you not to be able to see it through the glasses, that is such an annoyance. I am happy to report that the lashes are full and long still through the frames!

IMG_7609

IMG_7608

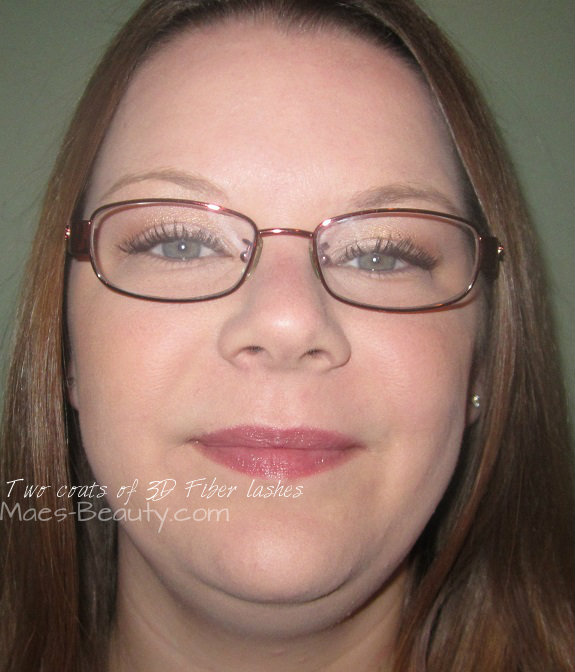
Again there was not a huge huge difference in the one to two coats so I am more than certain that with the one coat the lashes would still appear just as long and as full with one coat for us glasses wearers.

Here is a reference of what regular mascara does for my lashes now that you have seen the 3D Fiber lashes

This is an older picture (hence my old watermark) but still the same mascara I wear today 

img_12013

As you can see they appear long but not necessarily full at all

Here is a collage of all of the looks

collage

Overall my review of the new and improved younique Moonstruck 3D Fiber lashes is as follows:

Pros:

-Less time needed – by this mascara replacing your mascara rather than being an added step

-More cost effective again not having to use your own mascara first

         -Could potentially replace your mascara altogether

-Smaller case making easier to transport

-Much less messy, I didn’t have any fibers fall on my cheeks as I did with the old formula (both immediately and later on in the day)

-The windows on the bottle allow you to see how much you are using and know when it’s empty not like most beauty products.

-Pictures prove makes your lashes truly longer and fuller

Cons:

Honestly I don’t think there are any with the new formula. I was very happy with it

The new formula can be purchased for $29 or if you have an online or in house party you could earn it for free! (See below for Party info)

My sister sells through her website at Lashalotwithmissy.com or you can message her on facebook to be added to her facebook group. On her page she does make up videos and tutorials provides up to date info on the newest products. She reviews and posts the products so you can see them first hand before purchasing. Be sure to tell her you found her site through Mae’s Beauty 😉

Their improved website makes it easier to track your party points and know how much free product you have earned towards your 3D Fiber Lashes or the long list of other make up and beauty products they sell. Regardless of your area* (check out their shipping page) if you are interested in having an online party message Marissa and she will help you to earn points toward whatever make up it is that you desire from their site even if this mascara isn’t for you!

younique I hope you enjoyed my review of these lashes. I am much more excited to use these every day rather than my mascara especially seeing how it matches up next to one another. Please do check out her site to see the other products that younique has to offer.

The Lacquer Ring – Spoooookkyyyyy

Whoa, you are not reading this wrong, I am really posting from the blog! Blog posts take time and I just didn’t have any.. lol I was keeping up with my posts on my instagram account to make sure you are following that @maes.beauty  also on facebook at MaesBeauty page.

In any event, today TLR has some spooky looks for you for Halloween! Halloween is my FAVORITE holiday. I realized that this year I only did two Halloween looks…. two… and one of them I didn’t even picture. That’s sad.  So instead I will show you some of my favorite looks from prior Halloweens as it is Throw Back Thursday too after all.

These were our TLR ‘Inspired by Frosso’ last year Halloween, one of my favorites.

Click on the picture to be brought to the post.

003

These were my vampire bite nails, still today one my favorites

Click on the picture if you want to be brought to the post

img_1790

And last but certainly not least one of my other favorites, my werewolf nails

picture-235

This Throwback Thursday reviewing some of my old Halloween and regular manis reminds me of how much I have learned from my nail girls, and other bloggers. There are so many tips and tricks to nail art, to clean up, or just regular doing your nails that I didn’t know when I first started out.. Some of my pics were terrible… lol

Well, without further adieu, here are this years Spooky nails. I used OPI’s My Private Jet and stamped using Darling Diva Black Diamond

IMG_7561

As most of you may or may not know, I love The Nightmare Before Christmas! This year MoYou came out with what they call a ‘Gothic Collection’ Plate that is mostly NMBC that I got. I used it for this look, heres a picture of the awesome plate

IMG_7560

Make sure you check out the other Spooky TLR looks!

Next up will be my review of the YoUnique 3-D lashes! Ever tried them before? Well they have changed their formula and made it much easier to use and it still makes your lashes look amazing!

Also check out the other HPB link up Halloween nails!

The Lacquer Ring – Turquoise shimmer

Hello to anyone that reads this anymore… lol I am sorry.. I suck I only barely post twice a month it’s bad, but my life is hectic, not that anyone else’s isn’t… trust me I know.

To fill you all in as I think I sort of touched on, my husband’s brother(my brother-in-law), his fiancé (my future sister-in-law), and their two children moved back to NJ from AZ and are living with us for a while until they get on their feet. I took off a couple of days from work to help them move in and things are going well I think we got our schedule going with everyone in the house now… oh and did I mention in case you don’t know we also have 3 horses… not really horses lol but three large dogs 😉 lol. So with preparing for them to come and getting settled and all it’s been hard for me to paint, or blog but I am trying to come back 😉 I love my blog I love painting my nails it’s so relaxing as most of you know, it’s just finding the time which I am going to make sure that I do 🙂 Plus Ashley and I were doing our nails together a couple of times already so I’m getting her hooked hehe

#TheLacquerRing is also trying to come up with another segment twice a month like this for anyone that wants to collab like Stamping Saturdays for untrieds and such so keep an eye out for that 😉


Before I begin with the actual TLR post for this week, I want to first welcome our two newest exclusive members! Rei and Shelby Lou! Welcome Ladies to The Lacquer Ring!!

For this post, it was turquoise shimmer, I have always really wanted to try the turquoise gem nails, so why not… UGG! So for those of you that have tried it and did well, you suck. Those of you that don’t know I will explain… So it’s sort of like water marbling.

  • You paint your nails the base coat in this case mine was China Glaze’s Too Yacht to Handle.
  • Once dry, you can stamp a gold and/or a white a little bit as most turquoise has those hints. I used OPI’s Love.Angel.Music.Baby and China Glaze’s Dandy Lyin’ Around.
  • Again once dry you drip a couple of drops or only one of black into water I usedIllamasqua’sBoosh. Once it separates and is a big circle, again like water marbling but without the bullseye you lightly spray hairspray or alcohol on to it.
    • From there the black will separate and make a watermarbly or a turquoise design.
      • You dip one finger at a time in the water (unless you’re pro- I’m totally not) and while under take a pin or a toothpick and swirl it around in the top layer of the water to get the excess polish at the surface
  • Oh and before I forget in case you didn’t already knowing from water marbling TAPE, TAPE, TAPE, or latex. Just like water marbling this is MESSY, MESSY!
  • Once done you can sponge a little bit of the goldish and/or white again if you’d like
  • Top Coat and done (Oh and since this was turquoise shimmer I also did a coat of Enchanted Polish’s Ice Castle overtop for some extra shimmer)

With that being said I don’t know what I expected for my ‘first time’ but it wasn’t this… lol I like how it came out but it’s not as turquoise gem as I’d hope.

IMG_7533

IMG_7534

IMG_7536

IMG_7535

So what do you think of this? Have you tried this look and how did you make out?

Don’t forget to check out all the other girls posts for TLR and make sure you welcome our newest members! 😉

The Lacquer Ring – Tokidoki Unicorn

So as you have noticed the pattern we usually post TLR on Thursdays bi-weekly. Well this prompt we were all turds and super busy that we have all posted scattered rather than together like the intention of TLR. In any event this prompt was picked by Lesley @Misfitlesley inspired by the Tokidoki Unicorns that Frosso sent us last year. They came in these cute little boxes that you get a random one and surprisingly enough we all got different ones! Too stinkin cute!

My unicorns name is Dolce and I love him. I used OPI’s Going My Way or Norway? Then I hand painted on an angle Julep’s Carrie. For the sprinkles I hand painted on Opi’s Hey Baby and Cirque’s Tavern on the Teal. I painted the unicorn horn on my index finger using a nail art white. Finally I had a stamp of a small heart and I used Illamasqua’s Boosh and I hand painted the crossbones below it.


image5

image6

Isn’t Dolce too stinkin cute!

Make sure you check out all of the other Unicorns everyone got and their take on their little friends nails 😉

The Lacquer Ring Turns 1 – Baby Blue

Can you believe it! We have been doing The Lacquer Ring for one year already! Our very first post was our special polish Nicole got for us collab with Unicorn Bubbles. From there, we took off with each of us picking a color collab and a nail art theme collab.

This month’s pick was Lesley and she chose baby blue. My nails are atrocious right now! My brother in law and future sister in law and their two kids and possibly dog are all moving in for a while in less than two weeks now. I have been cleaning and organizing to make room for them. To say the least my hands and nails have taken a beating 😦

Luckly! I already had this gem (along with many others 😦 ) in my folder to post so it worked out perfect. This is Delush Polish’s Springing in the Rain. It’s a sky blue crelly filled with sprinkles of white and fuchsia glitters that remind you sunny days are ahead! (taken from Delush’s website)

IMG_7430

IMG_7433

IMG_7429

IMG_7428

So what do you think? I find it funny only because to me this is such a spring color and we are having nothing of the sort here on the East Coast. Today will be going up to 90, that’s not normal for our Spring.. smh How is the weather in your parts of the world? And how are you feeling this springy blue?

Don’t forget to check out the rest of the TLR gang’s looks. Oh and I almost forgot, we are cooking up some surprises for you this year in our upcoming TLR year, keep an eye out 😉

The Lacquer Ring – Aztec Nails

Hey there, long time no see. I have a whole folder of un-shown looks for you. Today we delayed our TLR looks from Thursday to now. In honor of Jess whose too busy for us hehe just kidding she works A LOT we did these nails for her this month. 🙂

First I painted Morgan Taylor My Carriage awaits. Once dry I used striping tape and did opposite triangles and filled it in with China Glaze Too Yacht to Handle. Once super dry I did my Aztec stamp using the triangle the opposite side using MoYou’s Pro Collection-02

71pu8K01jvL__SL1336_I then decided I felt like my look needed to be matte, I used OPI’s matte top coat and waited like 975283798273489 hours for it to dry. LOL Does anyone else have this problem? What I did as a trick, and maybe everyone already knows about this, I did a thin layer of my Seche Vite as that is lightening fast, and in about ten minutes just to be sure I used the matte topper. I went to bed about a half hour later and it worked! no sheet marks like every other time I’ve used matte yay!

Here’s my take on Aztec nails, whatdya think?

IMG_7447

IMG_7450

Well there ya have em, what do you think of my Aztec nails?

Don’t forget to check out the other girls nails!

The Lacquer Ring – Bikini Bottoms

A while back one of our TLR members went through quite a health scare. We were all so ecstatic when she got the clean bill of health we wanted to commemorate the occasion with what else, matching manis. Amy found the most gorgeous, vibrant, lively color she could and got one for all of us to share. We are finally here with it for you today.

TLR gives you, ILNP’s Bikini Bottoms!

You would not know it from us East Coaster polishes, but this is a gorgeous magenta holo. The reason I call us East Coasters out is it’s been raining for almost a week here and I at least couldn’t get a good shot of this holo goodness no matter what I tried 😦

ILNP describes this as: A ‘definite in-your-face (color) and “pops” like nothing else! Perfect for summer! Bottoms is a wonderfully vivid magenta pink holographic polish with a delicious blue hue that is sure to please!’ We agree that’s why this was the perfect choice for a joined celebration!

IMG_7436Of course I did a little accent using bikini bottoms along with some other summer staples using Jessica’s Strawberry Shake-It! See what I did there, very fitting in more ways than one to this mani 😉

IMG_7435Here you can kind of see the holo

IMG_7437Tried to get more lighting, it’s more of this darker magenta color than it appears in the first two pics.

Well hopefully the other girls have better pics for you as the shitty East Coast weather dampered my pics 😦

The Lacquer Ring – (WD) Negative Space Mani

It’s that time again and as you know it was Nicole’s pick this month. For our TLR collab for nail art she chose negative space nails.

For my fellow Walking Dead-ers this week is the season finale so I really wanted to use Dollish Polish’s Walker bait polish. I paired it with Ulta’s Concrete Evidence and some blood using China Glaze’s Adventure Red-y. If you watch the Walking Dead you will notice the two W’s I have on my nails you all know what that’s for … well we don’t know yet, but it’s a part of the current story line. For those of you that don’t it could just be for Walking dead 😉 lol

IMG_7416I absolutely love Walker Bait and I am so mad it was part of my un-trieds. I picked up this beauty from Dollish herself last year when we did the NYC Blogger Meet up which was really fun 🙂

IMG_7413

IMG_7415Well there you have it, There are my (Walking Dead) Negative Space nails

Any other Walkind Dead-ers out there? 🙂

Don’t forget to check out my fellow Lacquer Ringers manis here

St. Patty’s Day nails

Top o’ the mornin’ to ya! Happy St. Patrick’s Day!

Today I have some very festive nails for you in honor of the Holiday.

I used Philly Loves Lacquer’s Gilded Shamrock and topped It with Jessica’s 18K gold leaf topper. I painted Jessica’s Lime Cooler on my accent nail.  If you ordered the whole St Patty’s Day nail lacquer set from Philly Loves Lacquer you also got a set of gold and a set of green shamrock stickers from Lauren Walker at YouPolish. I put one of the gold ones as an accent.

Here tis’

IMG_7394

IMG_7392

Well, there you have it! Enjoy your St. Patrick’s Day, Drink responsibly! lol

The Lacquer Ring – Green

It’s TLR time again, Nicole’s up this month with her choice and she chose Green, very fitting for the upcoming St. Patrick’s Day!

I intended this to be much different than it turned out.. it’s not terrible or a fail just not the look I was going for. :/  I did Cirque’s Erda and topped it with ILNP’s Flakies (whattttt? again!! i know) Supernova.

So Supernova has Blue, Green, and Purple flakies. On my swatch stick, yes I swatch each color.. It looked mostly green with a little bit of purple. So before I move on let me explain about my swatches because there seems to be some buzz in some of the groups I’m in on FB. Anyway… I have these swatch plates below, and every time I get a new color, before it goes away I paint it and put the name of the polish. All of my polishes are sorted by color, not by shade, lol just all greens together, etc. I also put how many coats it took to get that so that I know if it took 3 coats, it’s not a good stamping polish. Some people think this is a waste, some people think that you can just look at the bottle.. but Erda is a perfect example of why that doesn’t work… For me Erda looks much darker in the bottle. Now I know by looking at my swatches… Just sayin 😉 lol

Nail-polish-font-b-swatches-b-font-display-boards-chuck-nail-polish-color-card-display-panelAnyway back to the mani.. so on the swatch plate Supernova looked more green on it’s on, I guess paired with the green it took on the other colors, which is fine just not what I’d hoped for is all.

IMG_7388So in this angle you see mostly the purple flakes, but at the tips and in the middle of my pinky, and the left side of my index you can really see the green, it’s more subtle because the green matches Erda, but that’s more of what I was looking for here. Either way I think it came out good, It’s just not as St. Patty’s Day as I wanted.

Here’s some more angles

IMG_7384See it’s a more even mixed of both the green and the purple on this one.

IMG_7383Same with this, more even mixture.

So what do you think, are you sick of me doing flakies yet? I just can’t help myself! AND she just came out with holo ones, I am trying very hard to not give in… lol

What’s your favorite green polish?

Here are the other girls green manis

Stamping Saturday – Elsa nails

Today I am going to the Philadelphia flower show. The theme is celebrate the movies inspired by the films of Disney and Disney/Pixar. As you know since there was so much hype over Frozen you KNOW there will be some Frozen displays. This gives me a chance to use my polish I got over Christmas!

So before you get scared, no I did not do full-on Elsa nails.. BUT I am going to bombard you with Elsa images, etc to set the tone since Frozen is literally EVERYWHERE!

I got Different Dimensions No one Elsa but you. It’s a holographic silvery blue polish with added shimmers, microglitters and real sterling silver flakies (direct from Different Dimensions website). I then did an accent nail using Orly’s Sweet Peacock and stamped a snowflake using Essie’s Blue Rhapsody.

Are you ready for Frozen overload? Here goes….

elsa

IMG_7374

IMG_7377

IMG_7381

IMG_7382

This went perfectly with Orly’s Peacock I really think that the vibrant shiny blue really brought out the shimmer and holo-ness that is this gorgeous Elsa color and visa versa. What do you think?

Don’t forget to check out the other girls Stamping Saturday looks.


If you have a look and want to join us, well c’mon then!

get the InLinkz code


Lastly before I go, in case you weren’t already singing it… you will be now ; )